Showing posts with label cooking/recipes. Show all posts

Wednesday, April 21, 2010

Busting Snack Time Boredom


I have about run out of ideas for snack time for my little bus load of children. It's not really a bus load, but the way they move around, sometimes it feels like there's 15 or 20 of them. There's really only four.

Yesterday I broke down and BOUGHT strawberries. I just can't wait for my June berries to grow, so I jumped the gun and bought a half flat at the store. I decided to try to pull things out of my kitchen that we could dip the berries in, without it being called "Chocolate" or "Cream" or anything else really fattening or loaded with calories that would just wrap around my hips and stay there for years. Like the cookies I just made. Life is all about balance here. The lovely part about this dip is you can use it for just about anything. I served mine with strawberries, banana chunks and Bare N*aked Pita chips and it was gooood. It's relatively low fat and low calorie, unless of course you just prefer to eat the whole thing with a spoon.

Enjoy!

Quick & Easy Sour Cream Fruit Dip
Prep time: 5 Minutes
Makes 8 2-Tbsp servings


Ingredients:
1/2 C Reduced Fat Sour Cream
1/4 C Crushed Pineapple
1 Tbsp Sugar
3-4 Whole Strawberries, hulled and diced
1 Tsp Cinnamon (optional)

Directions:
In a small bowl, combine reduced fat sour cream, crushed pineapple and sugar.
Stir until blended.
Mix in sugar and cinnamon to taste.
Dice 3 or 4 strawberries (or more) and fold into mixture.
Serve immediately with strawberries, bananas, pita chips or any other fruit or cracker that may need a pick-me-up, or just serve it as a topping over a bowl of diced fruit.

Options:
For thicker consistency, drain the pineapple before using.


 Nutrition facts calculated at www.Sparkpeople.com


Nutrition Facts 
(Dip Only)

  8 Servings                           Serving Size: 2 Tbsp

Amount Per Serving
  Calories 33.7
  Total Fat 1.9 g
      Saturated Fat 1.1 g
      Polyunsaturated Fat 0.1 g
      Monounsaturated Fat 0.5 g
  Cholesterol 5.9 mg
  Sodium 7.0 mg
  Potassium 40.3 mg
  Total Carbohydrate 3.9 g
      Dietary Fiber 0.4 g
      Sugars 2.7 g
  Protein 0.5 g

Tuesday, November 25, 2008

Forgetful Katie

Well, while I was out enjoying a bit of this:


I forgot all about this:


and this:

OOPSIE!

Umm, this was supposed to be my yoghurt. Not so much. I am not sure what one would call this. Maybe YO-cheese?

Saturday, November 1, 2008

Yo' Mamma


Yesterday I decided to try my hand at some homemade yoghurt .


So, I dug out the starter.


I had bought this yoghurt a while back, for the sole purpose of making my own yoghurt but I am a procrastinator by nature and I just hadn't got to it. I knew that this little gem had been in the back of my fridge for some time, the exact amount of time I was unsure.


So, when I caught a glimpse of the "Best by" date, I was slightly shocked. I say only slightly, because I don't like to clean out the fridge that often. And this little number was expensive, that much I did remember. But really, 08-18-07!

So I peeled back the plastic to reveal the most beautiful sight. Staring back at me was lovely plain yoghurt, teeming with probiotic life and only the tiniest bit of whey pooled on the top.

I sniffed. Smelled like yoghurt. I gave it the taste test. Tasted like yoghurt. (Then, I waited to make sure I didn't die.)


After a few hours, of no food poisoning effects I broke out my supplies.
Clean quart jars. Check. Stainless steel pot. Check. Thermometer. Check. Milk and starter. Check.


I called my smart tres' chic, hippy farm friend to get directions. Heat milk ever so slowly, to 100F (or till bubbles form around edges). Add 2 Tbsp starter and 2 Tbsp Powdered Milk. Mix well. Pour into jars.

Easy-schmeasy!


(read: note the placement of the cell phone, just in case I needed technical support)

Jars were filled, capped and placed in this insulated bag covered with towels and placed on top of my water heater to incubate. Where it is to remain untouched and undisturbed for a few days.

ACK!

I am such a mother hen. I want to peek and shake and poke these little jars, just to see how things are going. It's taking all of my will power not to mess with them. Just the idea of all that homemade goodness just sitting there.... It is going to be a long few days while I patiently wait for my little concoction to be ready for consumption.


I will let you know how it all turns out!

Tuesday, July 1, 2008

Kicking it up Coffee style

ICED COFFEE!
Summer brings about steamy weather, oven temp cars and hot mommas. One delightfully sinful way to cool off (for those of us that dream of Dutch Bros in our sleep) is iced coffee!

Here are some tips to make your own iced coffee not so BLAH and your insides go Hurrah! (Wow, that was a stretch.) It's the bomb, especially when you need your caffeine fix, but don't want to sweat through all your nice clothes with a steamy cup o'Joe in the afternoon. Plus, it's FRUGAL - as you're making less trips to the drive through coffee joint every afternoon for your addictions treats.

I have seen people just say to use leftover coffee from the morning. Go ahead - do that, if you want. It's certainly frugal and I applaud that! But in my case, the need for caffeine doesn't show up until it's too warm outside to have any hot coffee. Plus, it's a little too bitter tasting for me after I let it sit for a long time. So, I brew a double strength dose of the dark deliciousness and wait just a lil bit for it to cool somewhat. If you really plan ahead for this stuff, you can brew it the night before, and let it chill overnight in the fridge. Just don't ever set your hot pot of coffee directly into the fridge. Better yet, make coffee ice cubes. If you like sweetness, then add sugar or dry creamer only when it's still hot. They will not dissolve into cold coffee later (artificial sweeteners will do fine in either).

When you're ready for a tall glass of HELLO I LOVE YOU, you pull out a LOT of ice cubes (or your coffee ice cubes) and place them in a mason jar with a lid This makes it look much more country-glam while you mix it. Or, if you're hard up for time to find a clean jar and a lid, just put it into a tall glass.
The McDonald's coke glasses work really well for this drink. And, they're summer looking. Plus, they were free with the purchase of an extra value meal. I have extra value hips right now, how about that?

If you'd like, you can put in a little milk, liquid creamer or flavored syrup now. I like to do this before adding the coffee because it's just cool like that and it's easier to blend. I'm using Creme Brulee today because it's OOOHHHH MY GOSH GOOD.


Then, pour coffee over the top of everything and mix well or shake it up. If you're using a jar, don't forget to put the lid on before that very last direction. If you don't, your feet will have an iced coffee bath. Which, at the moment, doesn't sound so bad really.
Here's one more just for effect. Mmmmm!!

After everything is perfectly mixed, blended or shaken, remove the lid and drink directly from the jar pour your beverage into tall glasses and over more ice if necessary.

Enjoy your iced coffee! And, enjoy all that moolah you just saved by making it yourself at home.

Totally Useless Fact:
Did you know that Farmers Union Iced Coffee outsells Coca Cola in South Australia??
Hey, I can see why.

Thursday, June 5, 2008

Not Your Grandpa's PBandH

When I was growing up, I spent a lot of time with my Grandpa. Well, my Grandma was around a lot too, but it was my Grandpa who introduced me to the finer things in life. One of them was fishing off the docks at Winchester Bay with hot dogs and marshmallows. The second finest thing was the famous Peanut Butter and Honey sandwich. Now, I doubt I have to tell anyone how to make that, because it's sort of self-explanitory. But just for kicks - and to pass on some of my inherited wisdom, I decided to help my son make some first class PB&H. This was so he could stop having to be bored playing with the chickens.


Now listen closely. I have found the secret to not having that crusty, nasty block of honey in the bottom of the jar. Seriously. Bet you didn't know there was a secret. But really - just buy less honey more often. It's that easy! The guy around the corner from my little farm sells clover honey, but I haven't tried to buy it from him yet. I'm afraid of strangers. So, I get it at Winco. If you don't have a Winco, maybe you have some other larger grocery store with bulk food or a "gourmet" section. If you're lucky, you can also score your peanut butter there too. Ours are right next to each other. The nice thing is, it costs the same per pound whether you're getting half of a pound or ten pounds. If you're a price tag reader like me, this will make sense.


First you find the kind of honey that just sounds dang good to you. Or tastes good. That helps too. My pick was Blackberry Honey. At first I didn't want to stop the dispenser because it was jut too dang beautiful. But eventually I did. At about 2/3 of a pound. I put a lid on it, and dated it, that way I could do a little science experiment to see 1. How long before it started to crystalize or 2. How long before it got empty.

Then, I ground up some peanut butter. Dry roasted peanuts in a little machine. Voila!
You must use fresh peanuts, preferrably from a source of origin you wouldn't mind getting eggs from. Old peanuts have lots more mold. You can't see this mold, but it is there. Especially if they traveled a dozen weeks from China in not-well-sealed shipping containers. This particular mold is a carcinogen. Ok, enough about that. Just use fresh peanuts and use the fresh ground peanut butter faster than you would the processed Jif in your cupboard. Plus, your kids will think you're cool and you'll have less sugars, salts and oils to feed them.

So basically, you put a big (we're talking BIG) scoop of this fresh ground peanut butter in a medium mixing bowl. You can use a small bowl, but this is a messy job, so use a medium one.
Then, if you're not concerned about fat and calories, toss in a smaller blob of plain ol' margarine. It makes the peanut butter smoother and, well, buttery tasting and it adds back those oils you saved yourself from with the peanut butter. Ok, you can use Jif, but hey, this is my blog. Or at least my turn to blog.


Then, put a hefty sized dollop of honey in. Isn't this honey beautiful? It makes me want to have bees. But not really. That's like getting sheep to have a nice wool coat. It's not all that easy and glamorous. Did you know you can get bees without stingers? I just learned that yesterday when my husband was introducing the thought of hydroponics to me. Does anyone else think he's insane?

By the way - let your kid dollop the honey into the bowl after you have done the scoop and twirl. This way you don't get honey all over the entire planet.


Now, stir the lovely concoction. I mean, let your kid do the stirring. Then, while he goes to get a damp washcloth, secretly stir like mad behind him to get it all blended nicely. Then tell him what a wonderful job he has done. He will be very proud.
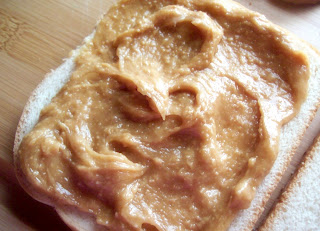

After you have blended everything into a nice, creamy dream, give one piece of WHOLE WHEAT WHITE bread (every mother's dream come true) a giant helping of the peanut butter and honey. Spread it so it looks like something out of a commerical, and top with another piece of nutritious white bread.

I prefer to put some honey straight on my bread. I think it comes from years of being lazy and not wanting to mix it all up ahead of time, but after it sits for a few minutes, it crystalizes a tiny bit into the bread and gives that delightful crunching sensation as the honey bursts into your mouth. I'm drooling.

Then, find someone to lick off the honey spoon.
I found this little squirt to be quite willing.
He is a good boy. Unless he's shrieking.

Assemble your sandwich however you wish.
Just because triangles are the rule in my house, doesn't mean you can't use squares.

I find the lightly salted Kettle Chips to be a delightful accompaniment to any food that is lacking salt to begin with. Toss a few slices of melon on the plate and you're good to go.

Enjoy!